Processing
Compression Molding is a type of composite processing that requires a two-part mold, even pressure, and elevated temperatures. It’s common in manufacturing skis, snowboards, and skateboards.
Steps for Compression Molding
- Make sure the mold is thoroughly coated with a release agent that’s good for use at elevated temperatures.
- Mix the desired amount of epoxy using the appropriate epoxy dispensing, measuring & mixing techniques.
- Apply the epoxy to the fiberglass using the appropriate wet layup technique and combine any other materials for the part.
- Place the part into the mold and/or press and apply pressure to consolidate the part. Apply heat to elevate the temperature and start the epoxy curing process.
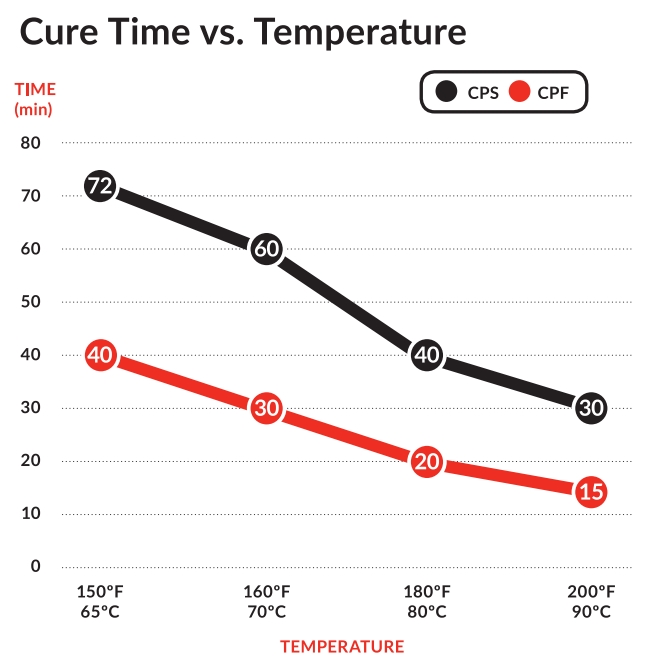
- Maintain the elevated temperature for the amount of time given in the Cure Time vs. Temperature graph below. Note: If you don’t have a press, you can achieve pressure with a vacuum bag set-up. Make sure that the vacuum bagging consumables can withstand the high processing temperatures.
- Allow the part to cool to room temperature before removing the pressure. When CPM Compression Molding Epoxy cures, it develops thermal stability up to 158˚F (70˚C) (shown on TDS as Tg). Since cure temperatures can be above this, to prevent deformation you must allow the part to cool before removing it from the mold. This will help you keep tight tolerances and great surface finishes.
- Trim and finish as necessary.
CPM does not contain UV stabilizing additives. We recommend adding a UV stable topcoat.


